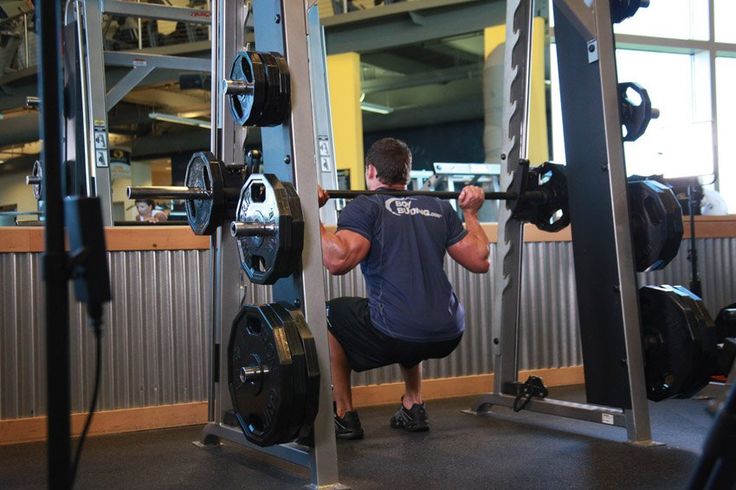
The Smith machine is one of the most debated pieces of gym equipment—some lifters love it for its stability and safety, while others dismiss it as "unnatural" compared to free weights. However, when used strategically (especially for squats), it offers distinct advantages that can benefit lifters at all levels.
Why the Smith Machine Deserves a Place in Your Leg Training
1. Fixed Bar Path: Stability vs. Functionality
- Smith Machine: The bar moves in a fixed vertical track, removing the need to balance the weight. This allows you to:
- Lift heavier loads (since you’re not fighting to stabilize the bar).
- Isolate specific muscles by adjusting foot placement (more on this later).
- Train safely without a spotter (thanks to built-in safety hooks).
- Barbell Squats: Require full-body coordination to control the bar’s path, engaging more stabilizer muscles (core, glutes, hamstrings). Better for athletic carryover but harder to overload purely for hypertrophy.
2. Muscle Activation Differences
While both exercises target the quads, glutes, and hamstrings, the Smith machine shifts emphasis:
- More Quad-Dominant: The fixed path reduces hip hinge mechanics, placing greater load on the quads.
- Less Core Engagement: Since the machine stabilizes the bar, your abs and lower back work less.
- Adjustable Targeting: By changing foot position, you can emphasize:
- Quads: Feet closer to the bar.
- Glutes/Hamstrings: Feet farther forward.
- Adductors: Wide stance.
3. Ideal Use Cases
- For Beginners: Learn squat mechanics safely without balance demands.
- For Hypertrophy: Lift heavier weights to overload muscles.
- For Injury Rehab: Reduce joint stress with controlled movement.
- For Advanced Lifters: Use as an accessory to target weak points (e.g., quad-focused sissy squats).
How to Use the Smith Machine Effectively
Proper Form (Step-by-Step)
- Set the Bar: Adjust to shoulder height.
- Position Yourself: Step under the bar, resting it on your upper traps (not your neck).
- Foot Placement: Walk feet 1–2 steps forward (prevents heel lift).
- Squat Down: Keep chest up, descend until thighs are parallel or lower.
- Drive Up: Push through your entire foot, squeezing glutes at the top.
Common Mistakes to Avoid
- Heels Rising: Feet are too close to the bar.
- Excessive Forward Lean: Poor core bracing or feet too far forward.
- Partial Reps: Ego lifting—always go full depth.
Best Smith Machine Squat Variations
- Smith Machine Split Squat
- Unilateral strength builder; great for fixing imbalances.
- Smith Machine Sissy Squat
- Brutal quad isolator; enhances knee stability.
- Feet-Elevated Smith Squat
- Increases glute activation (place feet on a small platform).

Smith Machine Squats vs. Free-Weight Squats: A Comprehensive Breakdown
1. Fixed Bar Path vs. Free Movement
The most fundamental difference between Smith machine and free-weight squats lies in the bar's movement pattern. The Smith machine's fixed vertical path eliminates the need for balancing the weight, significantly reducing core and stabilizer muscle engagement. This makes the movement more controlled but less functional. In contrast, barbell squats require active stabilization throughout the entire range of motion, forcing your core, glutes, and smaller stabilizers to work harder to maintain proper form. This makes free-weight squats superior for developing functional strength and athletic performance.
2. Safety Features
The Smith machine provides built-in safety hooks, allowing you to rack the bar at any point if you fail a rep. This makes it ideal for solo training or high-intensity sets where fatigue might compromise form. Free-weight squats, however, require either:
- A spotter for heavy lifts
- Knowledge of how to bail safely (dropping the bar backward in a power rack)
This makes traditional squats slightly riskier for beginners or those training without supervision.
3. Weight Differences
- Smith Machine Bar: Typically weighs 15–25 lbs (varies by manufacturer)
- Olympic Barbell: Standard weight is 45 lbs
Despite the lighter bar, studies show lifters can often handle 5–10% more weight on the Smith machine because they don’t have to expend energy stabilizing the load. This makes it useful for overloading the legs without worrying about balance limitations.
4. Muscle Activation Differences
- Barbell Squats:
- Higher core activation (abs, obliques, erectors)
- Greater glute and hamstring recruitment (due to hip hinge mechanics)
- More stabilizer muscle engagement (rotator cuffs, spinal erectors)
- Smith Machine Squats:
- Quad-dominant (due to fixed bar path reducing hip engagement)
- Adjustable muscle emphasis via foot positioning (more on this below)
- Less core demand (since the machine stabilizes the weight)
Muscles Worked in Smith Machine Squats
While Smith machine squats don’t engage stabilizers as much as free weights, they still effectively target major lower-body muscles:
Primary Muscles Worked
- Quadriceps (vastus lateralis, medialis, intermedius, rectus femoris)
- The main movers in Smith squats due to the upright torso position.
- Glutes (gluteus maximus & medius)
- Activated more when feet are placed forward.
- Adductors (inner thighs)
- Engaged significantly in wide-stance squats.
- Erector Spinae (lower back)
- Works isometrically to maintain posture but less than in free-weight squats.
Secondary Muscles Worked
- Hamstrings (biceps femoris, semitendinosus, semimembranosus)
- More active in feet-forward stances.
- Calves (gastrocnemius & soleus)
- Assist in knee stabilization during the movement.
Adjusting Foot Placement for Muscle Targeting
- Feet Forward (Heels Elevated) → More Glutes & Hamstrings
- Mimics a low-bar squat mechanic.
- Feet Directly Under Bar → Quad Dominant
- Similar to a hack squat or leg press.
- Wide Stance (Toes Out) → Inner Thighs & Glutes
- Resembles a sumo squat variation.
Key Benefits of Smith Machine Squats
- Beginner-Friendly
- The guided motion helps new lifters learn proper squat mechanics without worrying about balance.
- Safety hooks allow for easy reracking if the weight gets too heavy.
- Increased Load Capacity
- Since you’re not fighting to stabilize the bar, you can often lift heavier weights than with free weights.
- Useful for progressive overload in hypertrophy training.
- Targeted Muscle Emphasis
- By adjusting foot position, you can isolate quads, glutes, or hamstrings more precisely than in free-weight squats.
- Rehabilitation & Controlled Training
- Ideal for post-injury recovery (e.g., knee or back rehab) because the fixed path reduces joint shear forces.
- Allows controlled eccentric movements (slow lowering) for tendon strengthening.
Practical Takeaways
- For Strength Athletes: Free-weight squats are superior for carryover to sports and real-world strength.
- For Bodybuilders: Smith machine squats allow targeted hypertrophy with heavier loads.
- For Beginners/Rehab: The Smith machine is safer for learning form or rebuilding strength after injury.
Workout Split Example (2x Leg Days/Week)
Day 1: Heavy Strength Focus
Day 2: Hypertrophy & Isolation Focus
Day 1: Heavy Strength & Power
(Focus: Maximal strength, core stability, power development)

1. Barbell Back Squat (Free-Weight)
- Sets/Reps: 4x5 (heavy, 75-85% 1RM)
- Rest: 3-4 min
- Key Cues:
- Brace core hard, drive through midfoot
- Controlled descent, explosive ascent
2. Smith Machine Bulgarian Split Squat (Unilateral Strength)
- Sets/Reps: 3x8/leg
- Rest: 2 min
- Key Cues:
- Front foot far forward to emphasize glutes
- Keep torso upright
3. Romanian Deadlifts (Hamstring/Glute Focus)
- Sets/Reps: 3x8
- Rest: 2 min
4. Seated Calf Raises
- Sets/Reps: 4x15
- Rest: 1 min
Day 2: Hypertrophy & Quad Focus
(Focus: Muscle growth, time under tension, quad isolation)
1. Smith Machine Squat (Heavy, Feet Forward)
- Sets/Reps: 4x8 (70-75% 1RM)
- Rest: 2 min
- Key Cues:
- Feet 12" forward for glute engagement
- Pause at bottom for 1 second
2. Barbell Front Squat (Free-Weight, Quad Dominant)
- Sets/Reps: 3x10
- Rest: 2 min
3. Smith Machine Sissy Squat (Quad Burnout)
- Sets/Reps: 3x12-15
- Rest: 1 min
4. Leg Curls (Hamstring Isolation)
- Sets/Reps: 4x12
- Rest: 1 min

Programming Notes
- Progressive Overload:
- Add 2.5-5 lbs to lifts weekly (or reps if stalling).
- Deload Every 4-6 Weeks:
- Reduce volume by 50% for recovery.
- Warm-Up:
- 5-10 min dynamic stretching + 2 light squat sets.
Why This Works
- Balanced Development: Barbell squats build functional strength, while Smith machine variations isolate weak points.
- Injury Prevention: Controlled Smith movements reduce shear forces on joints during high-volume work.
- Flexibility: Adjust foot positions to prioritize quads (Day 2) or glutes (Day 1).
For beginners, start with 3x5 on barbell squats and 2x10 on Smith squats. Advanced lifters can add drop sets or cluster sets to the Smith machine work.
How to Perform Smith Machine Squats Correctly: A Detailed Guide
The Smith machine squat is an excellent exercise for building lower-body strength while maintaining safety and control. However, proper execution is crucial to maximize benefits and avoid injury. Below is a comprehensive breakdown of the setup, execution, and common mistakes to watch for.
Setup: Step-by-Step Instructions
- Adjust the Bar Height
- The bar should be set at shoulder height when standing upright.
- If it’s too high, you’ll struggle to unrack it smoothly; if too low, you’ll waste energy lifting it out of the hooks.
- Positioning Under the Bar
- Step under the bar so it rests on your upper traps (the meaty part of your upper back, not your neck).
- Placing it too high can strain your cervical spine, while too low shifts excessive load to your lower back.
- Grip Placement
- Hold the bar slightly wider than shoulder-width to maintain upper back tightness.
- A too-narrow grip can cause elbow strain, while too wide may reduce control.
- Foot Placement
- Unlike free-weight squats, your feet should be 1–2 steps forward from the bar’s natural path.
- This prevents excessive forward lean and keeps your heels grounded during the descent.
- Stance width should be shoulder-width or slightly wider, with toes pointed slightly outward.
Execution: Proper Movement Mechanics
- Unracking the Bar
- Twist the bar slightly to release it from the safety hooks.
- Stand tall, ensuring your spine is neutral and core braced before descending.
- Initiating the Descent
- Breathe in deeply and brace your core (like preparing for a punch to the stomach).
- Begin by pushing your hips back (as if sitting into a chair), not just bending the knees.
- Keep your chest up and shoulder blades squeezed to maintain upper back tension.
- Depth & Bottom Position
- Lower yourself until your thighs are at least parallel to the floor (or slightly below for greater glute activation).
- Knees should track in line with your toes—avoid letting them cave inward.
- Weight should be distributed through your midfoot and heels (not just toes).
- Driving Upward
- Push through your entire foot (not just toes) to stand back up.
- Focus on explosively extending the hips and knees while keeping the core tight.
- At the top, squeeze your glutes to fully engage the posterior chain.
- Re-racking the Bar
- After completing your reps, twist the bar back into the hooks to secure it.
- Don’t rush this step—losing control while re-racking can lead to injury.
Common Form Mistakes & Fixes
- Heels Lifting Off the Ground
- Cause: Feet are too close to the bar’s path, forcing weight onto the toes.
- Fix: Move feet slightly forward (1–2 steps) to keep heels planted.
- Excessive Forward Lean
- Cause: Poor core bracing or feet too far forward.
- Fix: Engage your lats and core before descending, and adjust foot position.
- Partial Reps (Not Hitting Depth)
- Cause: Ego lifting (too much weight) or mobility restrictions.
- Fix: Reduce weight and focus on full range of motion (thighs parallel or lower).
- Knees Caving Inward
- Cause: Weak glute medius or poor form awareness.
- Fix: Actively push knees outward during the movement.
- Lower Back Rounding ("Butt Wink")
- Cause: Poor hip mobility or overly narrow stance.
- Fix: Widen your stance slightly and work on hip mobility drills.
Why Proper Form Matters
- Safety: Prevents undue stress on knees, hips, and spine.
- Muscle Activation: Ensures quads, glutes, and hamstrings are properly engaged.
- Strength Gains: Full range of motion leads to better long-term progress.
Smith Machine Squat Variations Explained
The Smith machine isn’t just for standard squats—it’s a versatile tool for targeting different muscle groups with controlled, adjustable movements. Below, we break down two highly effective variations: the Smith Machine Split Squat and the Smith Machine Sissy Squat, explaining their benefits, proper execution, and muscle activation in detail.

1. Smith Machine Split Squat (Bulgarian-Style)
What It Targets:
- Primary Muscles: Quadriceps, glutes (emphasis on single-leg strength)
- Secondary Muscles: Hamstrings, calves, core (minimal due to Smith machine stability)
Why It’s Effective:
- Unilateral Training: Corrects muscle imbalances between legs.
- Increased Stability: Unlike dumbbell split squats, the Smith machine reduces balance demands, letting you focus purely on strength.
- Greater Range of Motion: The fixed bar path allows deeper lunges without fear of falling backward.
How to Perform It Correctly:
- Setup:
- Adjust the bar to upper chest/trap height.
- Stand facing away from the machine, resting the bar on your upper back.
- Place one foot 2–3 feet forward, the other foot extended back with only the toes touching.
- Execution:
- Unrack the bar by twisting it slightly.
- Lower your body slowly, keeping the front knee aligned with your toes.
- Descend until your back knee nearly touches the floor (or as low as mobility allows).
- Drive up through your front heel, squeezing the glutes at the top.
- Common Mistakes:
- Leaning too far forward → Keep torso upright.
- Front knee caving inward → Push knees outward.
- Rushing the movement → Control the descent for maximum muscle tension.
Programming Tips:
- Reps/Sets: 3–4 sets of 8–12 reps per leg.
- Use Case: Ideal as an accessory after heavy squats or for addressing leg imbalances.

2. Smith Machine Sissy Squat (Quad-Focused)
What It Targets:
- Primary Muscles: Quadriceps (especially the rectus femoris and vastus medialis)
- Secondary Muscles: Core (for balance), calves (minor)
Why It’s Effective:
- Isolates the Quads: Unlike traditional squats, the sissy squat minimizes glute and hamstring involvement, forcing the quads to work harder.
- Knee Extension Focus: Mimics the mechanics of leg extensions but with added resistance.
- Improved Knee Health: When performed correctly, it strengthens the tendons around the kneecap.
How to Perform It Correctly:
- Setup:
- Set the bar at shoulder height and position yourself underneath it.
- Rest the bar on your upper back, gripping it lightly for balance.
- Walk your feet slightly forward (about 6–12 inches from the bar’s path).
- Execution:
- Unrack the bar and shift your weight onto your toes (heels will lift naturally).
- Lean back while bending your knees, allowing them to track forward over your toes.
- Lower until your knees reach a 90° angle (or as far as comfortable).
- Pause briefly, then push through your toes to return to the start.
- Common Mistakes:
- Letting knees collapse inward → Keep them aligned with toes.
- Going too fast → Slow, controlled reps maximize quad engagement.
- Rounding the lower back → Maintain a slight arch to protect the spine.
Programming Tips:
- Reps/Sets: 3–4 sets of 10–15 reps (higher reps due to difficulty).
- Use Case: Best added at the end of leg workouts for a brutal quad burn.
Key Differences Between the Two Variations
- Split Squat: Focuses on single-leg strength and glute activation.
- Sissy Squat: Pure quad isolation, with minimal assistance from other muscles.
When to Use Them:
- For Balanced Leg Development: Alternate between both in your routine.
- For Weak Quads: Prioritize sissy squats.
- For Glute & Hamstring Focus: Use split squats with a longer stride.
Safety Notes:
- Sissy squats can be harsh on knees if done incorrectly—start light and focus on form.
- Split squats may require mobility work if you struggle with depth.
FAQs
Are Smith Machine Squats Effective?
Yes. Research (Schwanbeck et al., 2009) confirms that Smith machine squats activate many of the same major muscle groups as free-weight squats—particularly the quadriceps, glutes, and hamstrings. However, because the bar moves along a fixed track, the core and stabilizer muscles are less engaged compared to a traditional barbell squat.
Key Takeaway:
- Good for hypertrophy & strength (since you can often lift heavier).
- Less functional than free weights (due to reduced balance demands).
- Better for beginners (easier to learn form safely).
Do Smith Machine Squats Work the Core?
Minimally. The Smith machine’s guided bar path removes the need for your core to stabilize the weight, unlike a barbell squat where you must actively brace to prevent tipping forward or backward.
Comparison:
|
Barbell Squat |
Smith Machine Squat |
|
Engages abs, obliques, and lower back heavily |
Very little core activation |
|
Requires balance & coordination |
No need to stabilize the bar |
Key Takeaway:
If core strength is a priority, barbell squats are superior. However, Smith machine squats allow you to isolate leg muscles more effectively without core fatigue limiting your performance.
What’s the Best Foot Position?
Since the bar path is fixed, foot placement is crucial to avoid poor form.
1. Slightly Forward (Not Directly Under the Bar)
- Why? If your feet are directly beneath you (like in a barbell squat), your heels will lift, forcing you onto your toes.
- Fix: Take 1–2 small steps forward to keep heels planted.
2. Wider Than Shoulder-Width
- Why? A narrow stance can cause excessive forward lean or "butt wink" (lower back rounding).
- Fix: Widen your stance slightly (similar to a sumo squat) for better depth and comfort.
Optimal Stance Example:
- Feet: Shoulder-width or slightly wider
- Toes: Pointed slightly outward (10–30 degrees)
- Bar Path: Over midfoot (not drifting too far forward)
Key Takeaway: Experiment with foot placement to find what feels strongest and allows full range of motion.
Upgrade your training with Myovv—premium activewear designed for performance, comfort, and style. Whether you're lifting, running, or training at home, Myovv has the perfect gear to match your workout.
1. Best Men’s Workout Shorts
(For HIIT, Running, Leg Day & Hot Weather Training)
Top Pick: Myovv Performance Flex Shorts
- Why? Lightweight, sweat-wicking, and ultra-flexible for unrestricted movement.
- Best For: High-intensity training, sprints, and lower-body workouts.
Other Top Brands:
- Lululemon Pace Breaker Shorts
- Nike Flex Stride 5” Shorts
Best Exercises to Pair With Myovv Workout Shorts:
✅ HIIT/Cardio:
- Burpees
- Sprints
- Jump Rope
✅ Leg Day: - Barbell Squats
- Lunges
- Box Jumps
(Looking for men’s activewear shorts in Australia? Myovv ships locally with fast delivery!)
2. Best Men’s Workout Jogger Pants
(For Weightlifting, Cold Weather & Recovery Sessions)
Top Pick: Myovv Elite Training Joggers
- Why? Stretchy, tapered fit with moisture-wicking fabric—perfect for lifting and mobility work.
- Best For: Deadlifts, pull-ups, and post-workout recovery.
Other Top Brands:
- Lululemon Surge Joggers
- Nike Tech Fleece Joggers
Best Exercises to Pair With Myovv Joggers:
✅ Weightlifting:
- Deadlifts
- Overhead Press
- Pull-Ups
✅ Mobility/Recovery: - Yoga Flow
- Foam Rolling
- Walking Lunges
(For men’s workout jogger pants in Australia, Myovv offers premium quality with local shipping.)
3. Best Men’s Workout Tops
(For Breathability, Muscle Fit & Sweat Control)
Top Pick: Myovv Ultra-Dry Performance Tee
- Why? Odor-resistant, sweat-wicking, and designed for muscle support.
- Best For: Heavy lifting, HIIT, and endurance training.
Other Top Brands:
- Nike Dri-FIT Training Shirt
- Under Armour Tech 2.0
Best Exercises to Pair With Myovv Workout Tops:
✅ Upper Body Days:
- Bench Press
- Rows
- Push-Ups
✅ High-Intensity Workouts: - Battle Ropes
- Rowing Machine
- Plyometric Push-Ups
4. Best Men’s Activewear for Running
(Lightweight, Chafe-Free & Aerodynamic)
Top Pick: Myovv Speed Run Shorts
- Why? Lightweight with a built-in liner for zero chafing.
- Best For: Sprints, long-distance runs, and tempo training.
Other Top Brands:
- Brooks Sherpa 5” Shorts
- Nike AeroSwift Singlet
Best Running Workouts with Myovv Gear:
✅ Speed Work:
- 400m Intervals
- Hill Sprints
- Fartlek Training
✅ Long-Distance: - 10K Tempo Runs
- Marathon Prep
5. Best Men’s Activewear for Gym & Functional Training
(Durable, Flexible & Sweat-Wicking)
Top Pick: Myovv Flex Training Shorts & Joggers
- Why? Rugged yet flexible—ideal for CrossFit, squats, and plyometrics.
- Best For: Functional fitness, agility drills, and heavy lifting.
Other Top Brands:
- Reebok Nano Series
- Gymshark Adapt Fleece Joggers
Best Functional Workouts with Myovv Activewear:
✅ CrossFit/Functional Training:
- Kettlebell Swings
- Wall Balls
- Rope Climbs
✅ Plyometrics: - Depth Jumps
- Medicine Ball Slams
Why Choose Myovv?
✔ Premium Fabric: Sweat-wicking, stretchy, and durable.
✔ Perfect Fit: Designed for athletes, by athletes.
✔ Australia-Friendly: Fast shipping & easy returns.
Upgrade your gym wardrobe with Myovv—where performance meets style.
Want a personalized workout + activewear guide? DM us your training style! 🚀
Final Thoughts
While barbell squats remain the gold standard for lower-body development, the Smith machine offers unique benefits—particularly for beginners, lifters focusing on hypertrophy, or those recovering from injury. By adjusting foot placement and incorporating variations like split squats and sissy squats, lifters can maximize muscle growth and strength in a controlled environment.
Next time you see a Smith machine, consider giving it a try—you might be surprised by the results.
References
- Schwanbeck, S., Chilibeck, P.D., & Binsted, G. (2009). A Comparison of Free Weight Squat to Smith Machine Squat Using Electromyography.
- Cotterman, M., Darby, L., & Skelly, W. (2005). Comparison of Muscle Force Production Using the Smith Machine vs. Free Weights.
- Zhao, Z., et al. (2019). Static Low-Angle Squatting Reduces Intra-Articular Inflammation in Knee Osteoarthritis.
- Schwanbeck, S.R., et al. (2020). Effects of Training With Free Weights Versus Machines on Muscle Mass and Hormones.
5. Muscle Activation vs. Free Weights
- A 2009 study (Schwanbeck et al., Journal of Strength and Conditioning Research) found:
- Quadriceps activation was similar in Smith machine and barbell squats.
- Glute and hamstring engagement was 15–20% lower in Smith machine squats due to reduced hip hinge.
- Core activation was significantly lower (up to 30%) because the fixed path eliminates stabilization demands.
6. Strength & Loading Capacity
- Research (Cotterman et al., 2005) showed lifters could squat 5–10% heavier on the Smith machine versus free weights, as energy isn’t diverted to balance.
7. Rehabilitation & Safety
- A 2019 study (Zhao et al., BioMed Research International) noted that controlled, guided movements (like Smith machine squats) reduce joint shear forces, making them ideal for post-injury rehab.
8. Hypertrophy Potential
- A 2020 study (Schwanbeck et al.) concluded that Smith machine training produced similar muscle growth to free weights when volume and load were matched, though functional strength gains were inferior.
Leave a comment
This site is protected by hCaptcha and the hCaptcha Privacy Policy and Terms of Service apply.